Farmhouse 1:35

Farmhouse 1:35

The chicken coop – a farmhouse in 1:35


The accessories market offers a lot of interesting buildings for every era and every scale. Often, however, these are ruins or only parts of a house. For a “farmer diorama” I needed a complete and intact building – and therefore a self-construction was required! This farmhouse, which is a replica of a real chicken shed, was created in an easily comprehensible way. The materials used are limited to pine strips, depafit cardboard, commercially available plaster, balsa wood, plastic sheet and a little accessories from the railway range.

After a basic sketch and transfer to the Depafit carton (a foam covered with cardboard on both sides, all four walls are carefully cut out with the scalpel and the beam structure is carefully recorded.
I create the half-timbered construction from pine strips, which I cut precisely to its length and glue with white glue onthe substrate. When creating trusses, it is advisable to use original illustrations as a template.

The gaps are now carefully filled with thin-liquid plaster. Test the flowability of your plaster mixture in advance, as lumps release unsightly dents! After the plaster has been tied off and shows a certain strength, engraving can begin. The wetter the mass is, the easier it is to process and bring it into the desired shape. For engraving I use an engraving needle or a simple nail.

When all engraving work is complete, the individual walls can be glued. I fill the joints on the walls with a commercially available filler. I make the wood formwork in the gable from inscribed plastic sheet strips.

The small tool shed is also made of plastic panels. The wooden shingles on the roof are small balsa wood plates that are carefully glued side by side piece by piece. Admittedly tedious – but worthwhile!

I also make the gates and doors out of plastic. The roof on the building is a plaster cast of a roof slab from the railway accessories. Since I have other houses in the planning, a silicone molding position was offered.

The back of the chicken shed, which originally served as a house. The bay window on the roof of the building, which in turn was built of plastic, looks interesting.

I carry out the basic painting with the airbrush gun and all the subtleties and aging traces afterwards with the brush. Numerous glazing orders and dry painting treatments are necessary to give the stable a natural appearance. Special attention is paid to the quarry stone wall. Each individual stone is painted with a different color and aged accordingly. The impression of the wood in the gable, which is claimed by wind and weather, is also beautiful. On the dark brown base color, different light colours are applied in the dry painting mode until the desired effect is applied.

To make the appearance even more realistic, I sprinkle some moss from the dioramas to some places on the roof and then attach some ivy (dried natural material from the garden) to the front side. Also note the small eye-catchers, such as the bird dirt on the gable of the house! It is precisely such “little things” that make the model look alive.

Even if the construction of such a building is associated with a lot of work at first glance, it is simply fun to create something “own”. Just try it out – and you’ll find that it’s easier to
than one thinks!

A figure base with that certain extra!

A figure base with that certain extra!

A figure base with that certain extra!


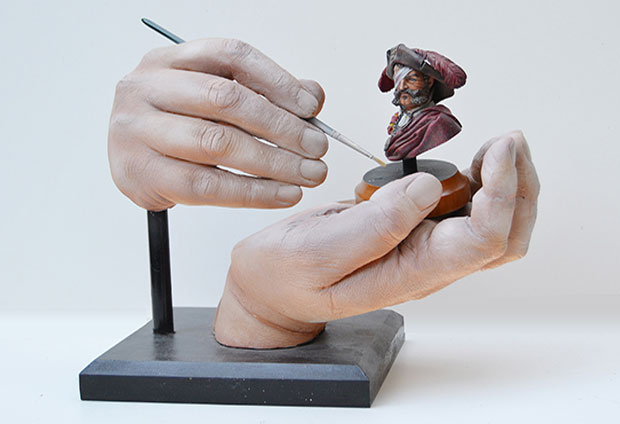
They worked on a figure for hours and now they want to present it accordingly. Normally, an interesting and exclusive wooden base comes into play! Nice… but somehow a bit boring in the long run! As a creative model maker, you are always looking for new ideas. During a visit to the dentist I had to have a bite print made … and thus came into contact with the material Alginate for the first time! Alginate is a moulding compound for single use. It is simply mixed with water and hardens within a few minutes! The shape is extremely precise and even gives the finest details. A short search on the internet and already the stuff was ordered.

The powdery molding compound can be obtained in different containers. Since I had other ideas in my head, I immediately bought myself a 3kg bucket. By the way, the taste is completely irrelevant (you can choose between strawberry or mint flavor) – because I didn’t want to reproduce my dent again! I had two hands holding a figure.

The creation of the shape is quite simple:

One looks for a suitable large vessel for the shape and mixes sufficient material according to the instructions for use! Mix well and leave to work for a few seconds.

Then simply sink your hand into the mass. It feels quite pleasant … if you don’t have to think about visiting the dentist again …! After a few minutes, you can see how the mass hardens. If the hand can be easily “triggered”, it can be pulled out carefully.

In principle, it is now possible to fill the mould with plaster or a ceramic mass.

When this is tied off, the alginate is carefully peeled from the casting.

The small “unevennesses” can be easily concealed and repaired with filler. The plaster can be easily sanded and machined.

Now comes the difficult part.

A 1:1 painting of a hand is a real challenge! I applied the basic skin color with the airbrush. All subtleties, such as fingernails and shades, have been coloured in the usual way of painting miniature figures.

In order to present the whole thing impressively, I donated both hands and fixed them on a small lacquered wooden slab!

In this case, I did not fix the figure – so you can use the hand display for various applications.

I have a few other ideas in mind: a hand holding an aircraft model, an outstretched hand with a vehicle … and maybe also a facial print, which looks mischievously and with a pinched eye at a figure ….! Let’s see what else comes up …!

My Friend the Tree

My Friend the Tree

My Friend the Tree


There is hardly a scene rye in model making in which they would not fit: trees! However, it is often not
because especially on a large scale from 1:35, the accessories market, either offers nothing suitable or puts the prices for a realistic-looking tree into the unattainable! This workshop is intended to show with what simple and inexpensive possibilities, entire forests can be created on our dioramas base plates.

Most of the materials come from nature. Walking in the nearby forest, I found some fallen trees. On closer inspection, I discovered some filigree roots that are ideal for using
of model trees. After a few comparisons, I prefer the roots of overturned spruce and pine trees. After I have cleaned the roots of all soil and loose bark, protruding and too long branches are cut with scissors.

Step 1: The root was straightened on the trunk and glued to a solid surface. It is recommended to fasten the root so that it is easily accessible from all sides.

Step 2: A 2-component kneading compound served as the starting material for the bark. The mass was
commercially available kitchen roll. In order to prevent gluing, the base surface (a glass or smooth
plastic plate) and the roll with talcum powder, which can be produced in each pharmacy. From the
rolled clay was now cut out matching pieces with the cutter and around like a second skin
the trunk and the larger branches.

Step 3: With a brush and clear water, the surface is smoothed and shaped. Fine
Modeling tool is ideal for engraving the rough tree bark. In the same way, old
Brushes, toothpicks and shashlick skewers. Finally, I formed from the remnants of the clay
some “sausages” from which the roots were modelled and also provided with a guts structure.

Step 4: After a drying phase of at least 24 hours, the mass is hardened and now the holes can be
drilled for the branches used.

Step 5: To represent a detailed and fine branching, I used “sea foam branches” that make it in the
architectural and railway accessories in different sized packing units. A standard pack is sufficient for
about 3-4 large trees. The individual branches were carefully glued into the pre-drilled holes with some white glue.
After the glue has dried, the tree is prepared for painting and greening.

Step 6. The entire construction has now been painted with commercially available adhesive primer by spray can. This helps in
primarily to stabilize the slightly fragile small branches and to ensure a uniform surface structure.
Create. In addition, one can already recognize the later appearance of our tree and one could
make any corrections.

Step 7: With the airbrush gun, the tree got its first paint application in a dark black-brown. Who
airbrush system, this can of course also be carried out with the help of spray cans. It is important to
however, that all branches and branches are given a rich paint application, so that you do not have unsightly spots later on.
can be found on the tree. The first brightenings can already be sprayed in this construction phase. I used a
slightly lighter tone than the brown base color.

Step 8: Now the branches should get its foliage. There are several ways to create realistic greening
Create. Whether you use the model railway accessories (flockage) or strive for natural materials
is up to everyone. If you love it extravagantly, you can also use laser-cut leaves – although it’s
is, of course, the most cost-intensive. A free option, but a bit tedious, is the
Collect birch syringes that need to be cleaned and dried.
I have discovered oregano as a favorite. This can be seen in every supermarket finely rattled for
a few cents. The entire treetop was fogbed with spray glue and generously sprinkled with the oregano. This
Process is repeated 4 to 5 times – until a satisfactory “fullness” has been set.

Step 9: The next step is now the painting of the arbor, in advance you should decide in which season you
wants to represent his tree. In every season, of course, the foliage looks different. In this case, it is summer. First, the
the entire crown is sprayed with a dark green. Various yellow-green and olive-green shades give the whole thing the
realism and colour contrast.

Step 10: Now it’s time to work out the details. Numerous washings and dry painting passages with various
Brown and green tones highlight the bark structure and underline the impression of the tree. In order to ensure that the environment is
of the small showpiece “Life”, I have made of a mixture with earth, sand, small stones and
White glue toae a porridge and applied on the dioramas base plate. After everything had dried through, sprinkled
I have some places with grass flakes, pebbles and dried flowers, which are still adapted to the overall scene a little
Were. Finally, I attached a chain with an old rubber tire to a dry branch of the tree and found
in the fundus still an old figure of a little boy from the fa. Belgo. Small eye-catchers, such as the barbed wire on the fence, the
from the Verlinden range, underlines the impact of the scene immensely.

detail view tree